Hello everyone! In this tutorial, I will try to explain and show the installation process of a ready-made RedAge v3 (NeptuneEvo) server on Linux in as much detail as possible.
We will use AlmaLinux 9.3, released on November 13, 2023, as a distribution. The characteristics of the server used are 2 cores, 8 GB RAM, 25 GB SSD.
All commands will be executed as the superuser - root. Please keep in mind that some cloud hostings by default provide access only to a regular user with the ability to elevate privileges via sudo.
There is also another important clarification: a full installation requires an operating system from the Windows family with Visual Studio + .NET SDK installed, and you must also have a database server (MariaDB).
We need Windows OS to build the project correctly, as well as build all the configs (.tt files), since I did not find a way to do this on Linux directly (if anyone has working options, please tell us about them in the comments).
Let's get started.
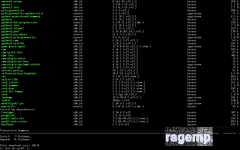
The first step after receiving a ready-made virtual server on Linux and connecting to it via SSH is always recommended to update the system and all packages. To do this, after logging in, run the following command:
During the installation process, we agree to the installation and update of components by pressing the Y key, then press Enter and the installation will begin. This process may take quite a while, wait for the process to complete.
After updating the system, the next step is to download a clean RAGE:MP server package for Linux. To do this, run the following command:
After the archive has finished downloading, it must be unpacked. To do this, run the following command:
This is a compound command. First, we install the package - tar (if it is not in the system, it usually is), and then unpack the previously downloaded archive.
Next, you need to grant the server executable file permissions to run using the command:
The final step in installing a clean RAGE:MP server is to run it with the command:
This is a compound command. First, we go to the ragemp-srv folder, and then, in the second step, we run the executable file - ragemp-server.
Attention! If you get an error - error while loading shared libraries: libatomic.so.1: cannot open shared object file: No such file or directory
You just need to install the missing package on the system using the command:
After executing this command, return to the previous step (launching a clean server).
We have installed and launched a clean server (base). You can install any server build on this template, but of course we will install RedAge v3 further.
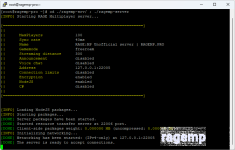
An example of a successful launch output is shown in the screenshot, there should be no errors.
To stop the server and be able to perform the following steps, you need to press the key combination Ctrl + C.
This key combination is used in Linux to interrupt the current process. It is recommended to remember this.
Next, we need to install and configure the environment for building the RedAge v3 server, namely MySQL, Redis and .NET.
We will act in order and start with the database server. I prefer to use MariaDB. To install it, run the following command:
During the installation process, agree to install and update components by pressing the - Y key, then press Enter and the installation will begin.
After the installation of the database server is complete, you must enable the service and start the server process. To do this, run the following command:
Then we make sure that the command was executed successfully - the service has started and is running. To do this, use the following command:
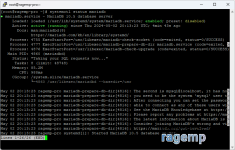
An example of a successful launch output is shown in the screenshot. Note the two green inscriptions - 'enabled' and 'active (running)'. There should be no errors.
To continue with the next steps, you need to press the key combination Ctrl + C (you already remembered this, right?).
Now you need to create a file at /etc/my.cnf.d/character-set.cnf, with the following content:
After saving this file, you need to restart the database server using the command:
Next, we need to enter the MySQL shell, create several databases, create a user and give him the privileges necessary for work.
To enter the MySQL shell, run the following command:
Inside this interface, we execute the following commands sequentially:
The output after entering each command should be - Query OK. There should be no errors.
Exit the MySQL interface using the Ctrl + C key combination.
Next, we need to import the dumps (.sql files) into the newly created databases.
To do this, upload all three files from the database folder (located in the assembly archive) to the server directory - /root.
For this, you can use SFTP or SCP tools. Detailed instructions for transferring files will not be provided here, but you can find them on the Internet.
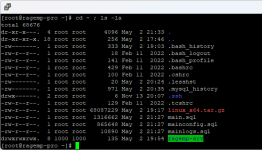
To make sure before the next step that these 3 files exist in the current directory, run the command:
This is a compound command. First, we go to the home folder (in my case - /root) and view the contents of the current directory.
An example of the correct launch output is shown in the screenshot, as we see the files - main.sql, mainconfig.sql, mainlogs.sql exist.
Then we import the data using the command:
This is also a compound command, it fills the specified tables with data one by one.
Note that I am acting on behalf of the user - root, so I do not need to specify a password.
If the command is successfully executed, the output should be empty.
At this point, the MySQL installation and configuration stage is complete, let's move on to the stage of configuring the configs on your Windows computer.
You should already have MariaDB + HeidiSQL installed. Open the HeidiSQL program, connect to the local server and create 3 databases (ra3_main, ra3_mainconfig, ra3_mainlogs) by right-clicking on our connection in the left menu.
After that, you need to click on the icon of two people in the top menu, the user manager for the database will open.

Now in this menu we create a new user (button - Add) - redage, set the password created earlier, then add access to the databases (button - Add object) using the pressed Ctrl, select all 3 databases, do not forget to check the boxes for access rights.
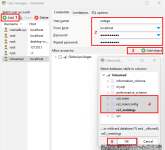
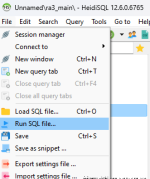
Close the user manager and import the dumps (.sql files) into the corresponding databases. To do this, select the desired database one by one (until a green check mark appears) and select File -> Run SQL file .. in the context menu.
Next, go to the folder with the server assembly on your Windows PC and open the file using Visual Studio - redage_v3\dotnet\resources\NeptuneEvo.sln
In the left menu (Solution Explorer), go to the file - NeptuneEvo -> Database -> Config -> Config.tt.
In it, edit the line with the data for connecting MySQL, the user is redage, the password is the one we created earlier, then press Ctrl + S (and wait for the download to finish).
We do the same with another file inside this menu - NeptuneEvo -> Database -> Server -> ServerStruct.tt
It should look something like this:
In the file - Config.tt:
In the file - ServerStruct.tt:
After that, we execute - Build - Rebuild Solution. At this stage, if you did everything correctly, there should be no errors.
If there are errors, carefully read the instructions and double-check each step, most likely you made a mistake due to carelessness.
Now an important step that everyone constantly forgets to do - also edit the data for connecting the database in the file - redage_v3\settings\mainDB.json (change only the user and password that you set earlier).
The next step is to download only the necessary build files over a clean (empty) server on our Linux (at this stage, we omit the moments with the src_client and src_cef build, since this should already be done, if not, see the main instructions).
List of files and folders that you should upload to the /root/ragemp-srv folder:
redage_v3\backups
redage_v3\client_packages
redage_v3\dotnet\resources
redage_v3\dotnet\settings.xml
redage_v3\json
redage_v3\settings
redage_v3\conf.json
Attention! Do not replace the folder - /root/ragemp-srv/dotnet/runtime otherwise you will have problems starting the server, as you can see this folder is not in the list of required ones to upload to your server.
When the files are uploaded, you need to perform a few final steps to complete the installation, namely installing the required version of OpenSSL + we have unconfigured Redis.
To do this, run the following command:
Once the Redis installation is complete, you need to enable the service and start the process. To do this, run the following command:
Well done if you got to this stage without errors, there is one last final step to fix the error when starting the server - Void OnPlayerConnected(NeptuneEvo.Handles.ExtPlayer) doesn't match event signature ("PlayerConnected"). To do this, run the following command:
Now you can finally start the server using the command:
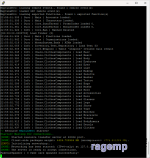
An example of a successful launch output is shown in the screenshot. There should be no errors.
Also for convenience and to replace RestartOnCrash (as we did on Windows), we can make the server a service in Linux so that it restarts itself when restarting or crashing:
Auto-raising the RAGE:MP server in case of a crash (Linux).
I hope I explained everything clearly and the issue with installing the RedAge v3 server on Linux is now closed.
Ask if something is unclear, if I have time, I will answer and try to help.
We will use AlmaLinux 9.3, released on November 13, 2023, as a distribution. The characteristics of the server used are 2 cores, 8 GB RAM, 25 GB SSD.
All commands will be executed as the superuser - root. Please keep in mind that some cloud hostings by default provide access only to a regular user with the ability to elevate privileges via sudo.
There is also another important clarification: a full installation requires an operating system from the Windows family with Visual Studio + .NET SDK installed, and you must also have a database server (MariaDB).
We need Windows OS to build the project correctly, as well as build all the configs (.tt files), since I did not find a way to do this on Linux directly (if anyone has working options, please tell us about them in the comments).
Let's get started.
The first step after receiving a ready-made virtual server on Linux and connecting to it via SSH is always recommended to update the system and all packages. To do this, after logging in, run the following command:
Bash:
sudo dnf upgradeDuring the installation process, we agree to the installation and update of components by pressing the Y key, then press Enter and the installation will begin. This process may take quite a while, wait for the process to complete.

After updating the system, the next step is to download a clean RAGE:MP server package for Linux. To do this, run the following command:
Bash:
sudo curl -O https://cdn.rage.mp/updater/prerelease/server-files/linux_x64.tar.gzAfter the archive has finished downloading, it must be unpacked. To do this, run the following command:
This is a compound command. First, we install the package - tar (if it is not in the system, it usually is), and then unpack the previously downloaded archive.
Code:
sudo dnf install tar ; sudo tar -xzf linux_x64.tar.gz
Bash:
sudo chmod +x ~/ragemp-srv/ragemp-serverThe final step in installing a clean RAGE:MP server is to run it with the command:
Bash:
cd ~/ragemp-srv/ ; ./ragemp-serverAttention! If you get an error - error while loading shared libraries: libatomic.so.1: cannot open shared object file: No such file or directory
You just need to install the missing package on the system using the command:
Bash:
sudo dnf install libatomicAfter executing this command, return to the previous step (launching a clean server).
We have installed and launched a clean server (base). You can install any server build on this template, but of course we will install RedAge v3 further.
An example of a successful launch output is shown in the screenshot, there should be no errors.

To stop the server and be able to perform the following steps, you need to press the key combination Ctrl + C.
This key combination is used in Linux to interrupt the current process. It is recommended to remember this.
Next, we need to install and configure the environment for building the RedAge v3 server, namely MySQL, Redis and .NET.
We will act in order and start with the database server. I prefer to use MariaDB. To install it, run the following command:
Bash:
sudo dnf install mariadb-serverDuring the installation process, agree to install and update components by pressing the - Y key, then press Enter and the installation will begin.
After the installation of the database server is complete, you must enable the service and start the server process. To do this, run the following command:
Bash:
sudo systemctl enable --now mariadb
Bash:
systemctl status mariadbAn example of a successful launch output is shown in the screenshot. Note the two green inscriptions - 'enabled' and 'active (running)'. There should be no errors.

To continue with the next steps, you need to press the key combination Ctrl + C (you already remembered this, right?).
Now you need to create a file at /etc/my.cnf.d/character-set.cnf, with the following content:
Code:
[client]
default-character-set = utf8mb4

[mysql]
default-character-set = utf8mb4

[mysqld]
character-set-client-handshake = FALSE
collation-server = utf8mb4_unicode_ci
init-connect = 'SET NAMES utf8mb4 COLLATE utf8mb4_unicode_ci'
character-set-server = utf8mb4
Bash:
sudo service mariadb restartNext, we need to enter the MySQL shell, create several databases, create a user and give him the privileges necessary for work.
To enter the MySQL shell, run the following command:
Bash:
sudo mysqlInside this interface, we execute the following commands sequentially:
SQL:
// Создаем базы данных
CREATE DATABASE ra3_main;
CREATE DATABASE ra3_mainconfig;
CREATE DATABASE ra3_mainlogs;

// Создаем пользователя для работы с базами данных
// Не забудьте изменить пароль внутри кавычек на свой.
CREATE USER 'redage'@'localhost' IDENTIFIED BY 'kB20Aps8jX';

// Предоставляем пользователю полный доступ к двум базам данных
GRANT ALL PRIVILEGES ON ra3_main.* TO 'redage'@'localhost';
GRANT ALL PRIVILEGES ON ra3_mainconfig.* TO 'redage'@'localhost';
GRANT ALL PRIVILEGES ON ra3_mainlogs.* TO 'redage'@'localhost';

GRANT SUPER ON *.* TO 'redage'@'localhost';

// В самом конце - обновляем таблицу привилегий в памяти
FLUSH PRIVILEGES;
The output after entering each command should be - Query OK. There should be no errors.
Exit the MySQL interface using the Ctrl + C key combination.
Next, we need to import the dumps (.sql files) into the newly created databases.
To do this, upload all three files from the database folder (located in the assembly archive) to the server directory - /root.
For this, you can use SFTP or SCP tools. Detailed instructions for transferring files will not be provided here, but you can find them on the Internet.
To make sure before the next step that these 3 files exist in the current directory, run the command:
Bash:
cd ~ ; ls -laThis is a compound command. First, we go to the home folder (in my case - /root) and view the contents of the current directory.
An example of the correct launch output is shown in the screenshot, as we see the files - main.sql, mainconfig.sql, mainlogs.sql exist.

Then we import the data using the command:
Bash:
sudo mysql ra3_main < main.sql ; sudo mysql ra3_mainconfig < mainconfig.sql ; sudo mysql ra3_mainlogs < mainlogs.sqlThis is also a compound command, it fills the specified tables with data one by one.
Note that I am acting on behalf of the user - root, so I do not need to specify a password.
If the command is successfully executed, the output should be empty.
At this point, the MySQL installation and configuration stage is complete, let's move on to the stage of configuring the configs on your Windows computer.
You should already have MariaDB + HeidiSQL installed. Open the HeidiSQL program, connect to the local server and create 3 databases (ra3_main, ra3_mainconfig, ra3_mainlogs) by right-clicking on our connection in the left menu.
After that, you need to click on the icon of two people in the top menu, the user manager for the database will open.

Now in this menu we create a new user (button - Add) - redage, set the password created earlier, then add access to the databases (button - Add object) using the pressed Ctrl, select all 3 databases, do not forget to check the boxes for access rights.

Close the user manager and import the dumps (.sql files) into the corresponding databases. To do this, select the desired database one by one (until a green check mark appears) and select File -> Run SQL file .. in the context menu.

Next, go to the folder with the server assembly on your Windows PC and open the file using Visual Studio - redage_v3\dotnet\resources\NeptuneEvo.sln
In the left menu (Solution Explorer), go to the file - NeptuneEvo -> Database -> Config -> Config.tt.
In it, edit the line with the data for connecting MySQL, the user is redage, the password is the one we created earlier, then press Ctrl + S (and wait for the download to finish).
We do the same with another file inside this menu - NeptuneEvo -> Database -> Server -> ServerStruct.tt
It should look something like this:
In the file - Config.tt:
C#:
LoadMySqlMetadata("127.0.0.1", "ra3_mainconfig", "redage", "kB20Aps8jX");
C#:
LoadMySqlMetadata("127.0.0.1", "ra3_main", "redage", "kB20Aps8jX");After that, we execute - Build - Rebuild Solution. At this stage, if you did everything correctly, there should be no errors.
If there are errors, carefully read the instructions and double-check each step, most likely you made a mistake due to carelessness.
Now an important step that everyone constantly forgets to do - also edit the data for connecting the database in the file - redage_v3\settings\mainDB.json (change only the user and password that you set earlier).
The next step is to download only the necessary build files over a clean (empty) server on our Linux (at this stage, we omit the moments with the src_client and src_cef build, since this should already be done, if not, see the main instructions).
List of files and folders that you should upload to the /root/ragemp-srv folder:
redage_v3\backups
redage_v3\client_packages
redage_v3\dotnet\resources
redage_v3\dotnet\settings.xml
redage_v3\json
redage_v3\settings
redage_v3\conf.json
Attention! Do not replace the folder - /root/ragemp-srv/dotnet/runtime otherwise you will have problems starting the server, as you can see this folder is not in the list of required ones to upload to your server.
When the files are uploaded, you need to perform a few final steps to complete the installation, namely installing the required version of OpenSSL + we have unconfigured Redis.
To do this, run the following command:
Bash:
sudo dnf install compat-openssl11 redisOnce the Redis installation is complete, you need to enable the service and start the process. To do this, run the following command:
Bash:
sudo systemctl enable --now redisWell done if you got to this stage without errors, there is one last final step to fix the error when starting the server - Void OnPlayerConnected(NeptuneEvo.Handles.ExtPlayer) doesn't match event signature ("PlayerConnected"). To do this, run the following command:
Bash:
sudo cp -r ~/ragemp-srv/dotnet/resources/NeptuneEvo/Bootstrapper.dll ~/ragemp-srv/dotnet/runtime/Now you can finally start the server using the command:
Bash:
cd ~/ragemp-srv/ ; ./ragemp-serverAn example of a successful launch output is shown in the screenshot. There should be no errors.

Also for convenience and to replace RestartOnCrash (as we did on Windows), we can make the server a service in Linux so that it restarts itself when restarting or crashing:
Auto-raising the RAGE:MP server in case of a crash (Linux).
I hope I explained everything clearly and the issue with installing the RedAge v3 server on Linux is now closed.
Ask if something is unclear, if I have time, I will answer and try to help.